


Life is Better in Bikinis | Creating Texture & Dimension on a Beach-Themed Card featuring Love From Lizi
- Pam
- Feb 8
- 5 min read
Updated: Feb 15
Even though it’s February and the cold weather has settled in, I couldn’t resist creating a card that brings a little summer sunshine to my craft table! Today, I’m sharing a vibrant, beachy card featuring the Love From Lizi "To The Beach" card kit. This kit is packed with stunning elements that make scene-building effortless, and I had so much fun layering textures and patterns to bring this card to life!

A Retro Beach Vibe
I wanted this card to capture a fun, vintage-inspired beach scene, and the kit’s imagery made that easy. The focal point is a stylish sunbather with flowing hair, rocking her bikini and high-waisted shorts—perfect for that classic pin-up look! I gave her a bold pop of color with a deep red bow in her hair for added dimension.
The background features beautifully illustrated beach huts, which I layered to create depth. The warm, sandy tones contrast nicely with the red, white, and blue color scheme, making the whole scene feel sun-soaked and inviting.


Supplies Used
Love From Lizi To The Beach Card Kit, includes:
Ranger Distress Heavystock Cardstock
Large Flat Paintbrush
Taylored Expressions Glitter Grab
stencil brush
Distress Oxide Tumbled Glass
Distress Oxide Salty Ocean
foam squares
foam tape
Bearly Art Liquid Glue Adhesive
Catherine Pooler Cranberry Fizz Dye Ink
Catherine Pooler Something Borrowed Dye Ink
Clear Wink of Stella
Taylored Expressions Red Pepper Cardstock
Adding Texture & Details
To make the card feel more dynamic and visually engaging, I:
Created realistic sand texture using liquid glue and the shaker mix from the kit, which is a mix of ivory sand, golden glitter, micro balls, and flakes.
Used stencil brushes to softly blend blue into the sky to create a cohesive look that ties the die cuts and background together.
Layered die cuts of a beach chair and umbrella using foam squares to add dimension and extend the scene outward.
Used masking tape to ink the sentiment in two colors—blue and red— adding a bold, playful touch to the phrase "Life is better in BIKINIS."
Step-by-Step Instructions
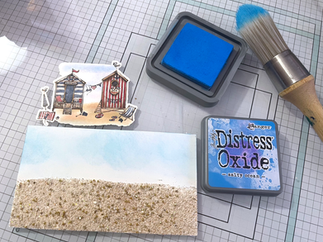
1. Create the Card Panel & Textured Sand
Start with a sheet of heavyweight white cardstock (110# or more) and trim it to 5.75" x 3.25"—this will be your card panel.
Using a paintbrush, apply liquid adhesive (such as Taylored Expressions "Glitter Grab") to the bottom 1.5 inches of the panel. Before the adhesive dries, generously sprinkle the Love From Lizi "To The Beach" Shaker Mix over the area, letting the blend of ivory sand, golden glitter, micro balls, and flakes create a stunning sandy texture. Tap off any excess and reapply as needed for a full, even coverage. Set aside to dry.


2. Blend a Soft Sky Background
To seamlessly integrate the die-cut beach huts into the scene, use a stencil brush to lightly blend Distress Oxide Inks in Tumbled Glass and Salty Ocean across the top of the card panel. Keep the blending soft and airy, leaving some white spaces to mimic the natural, uneven tones of the sky in the ephemera pieces.


3. Assemble the Beach Huts
Select the two beach hut die cuts from the "To The Beach" Ephemera Pack. Apply a single layer of foam squares to the back of each hut, then add a touch of liquid glue to the foam for extra hold. Position the huts slightly near the horizon line, ensuring they extend beyond the card panel for a more immersive, dimensional scene. Trim any overhanging edges and place a heavy object on top while the glue sets against the textured sand.

4. Add Foreground Elements with Extra Dimension
Choose the left-facing beach chair and umbrella from the ephemera pack. To make these elements pop, apply a double layer of foam squares to the back, reinforcing them with liquid glue. Position the chair and umbrella on the bottom right side of the card panel, grounding them into the sandy foreground. Place a heavy object on top while the glue sets against the textured sand.

5. Feature the Focal Point: The Beach Girl
Select one of the stylish girl die cuts from the ephemera pack. From the embellishment bag, choose a bow embellishment and adhere it to her hair using liquid glue or a glue dot for an extra playful touch.

Apply a double layer of foam squares to the back of the girl die cut, then secure it with liquid glue. Place her slightly off-center toward the bottom of the card to bring the scene together. Place a heavy object on top while the glue sets against the textured sand.

6. Stamp & Customize the Sentiment
Using the "Life is better in BIKINI" sentiment from the "To The Beach" stamp set, create a two-tone effect:
Place the stamp on a stamping platform and mask off the word "BIKINI" using masking tape. Ink the rest of the sentiment in Catherine Pooler Something Borrowed ink, remove the mask, and stamp it onto white cardstock.
Repeat the process, this time masking off the rest of the sentiment and inking "BIKINI" in Catherine Pooler Cranberry Fizz ink.
To make "BIKINIS" plural, use masking to selectively add an "S" from another sentiment in the set.
Use a Brother Scan ‘n Cut or fussy cut the sentiment by hand. Apply one layer of foam adhesive to the back, add liquid glue, and place it on the bottom left side of the card panel. Place a heavy object on top while the glue sets against the textured sand.

7. Finishing Touches for Extra Sparkle
Using a fine-tip glue bottle, carefully adhere a few gold micro balls from the shaker mix onto the die-cut sand areas to enhance cohesion between the textured background and foreground elements.
Apply Clear Wink of Stella to highlight the gold accents on the girl’s outfit and accessories, giving them an eye-catching shimmer.

8. Assemble the Final Card
Trim a piece of red cardstock to 6" x 3.5" and adhere it to the front of a top-folding mini slimline card base using a tape runner.
Finally, attach the completed card panel onto the red cardstock with a single layer of foam adhesive for a polished, professional finish.

A Splash of Summer in Winter
This card was such a joy to make, and it has me dreaming of warm weather already! Whether you're crafting for a summer birthday, a vacation memory, or just to escape the winter blues, the To The Beach kit has everything you need to create stunning seaside scenes.
Are you making any summer-inspired cards this season? Let me know in the comments—I’d love to see what you’re creating! 🌊☀️
Thanks for stopping by! Happy crafting :)

Going to do some crafty shopping?
Consider using my affiliate links to help support my blog at no extra cost to you!
Use my REFERRAL LINK at Taylored Expressions to get $10 OFF YOUR FIRST ORDER


Comments